
How to rewire a boat trailer, you may wonder. As time goes by, corrosion takes place, and the lights stop working. Rewiring a boat trailer refers to replacing the old wiring and lights. By doing this, you’re ensuring that your trailer is working in full operation and also preventing any potential damages to your boat when transporting.
Without further ado, let’s get started on today’s article.
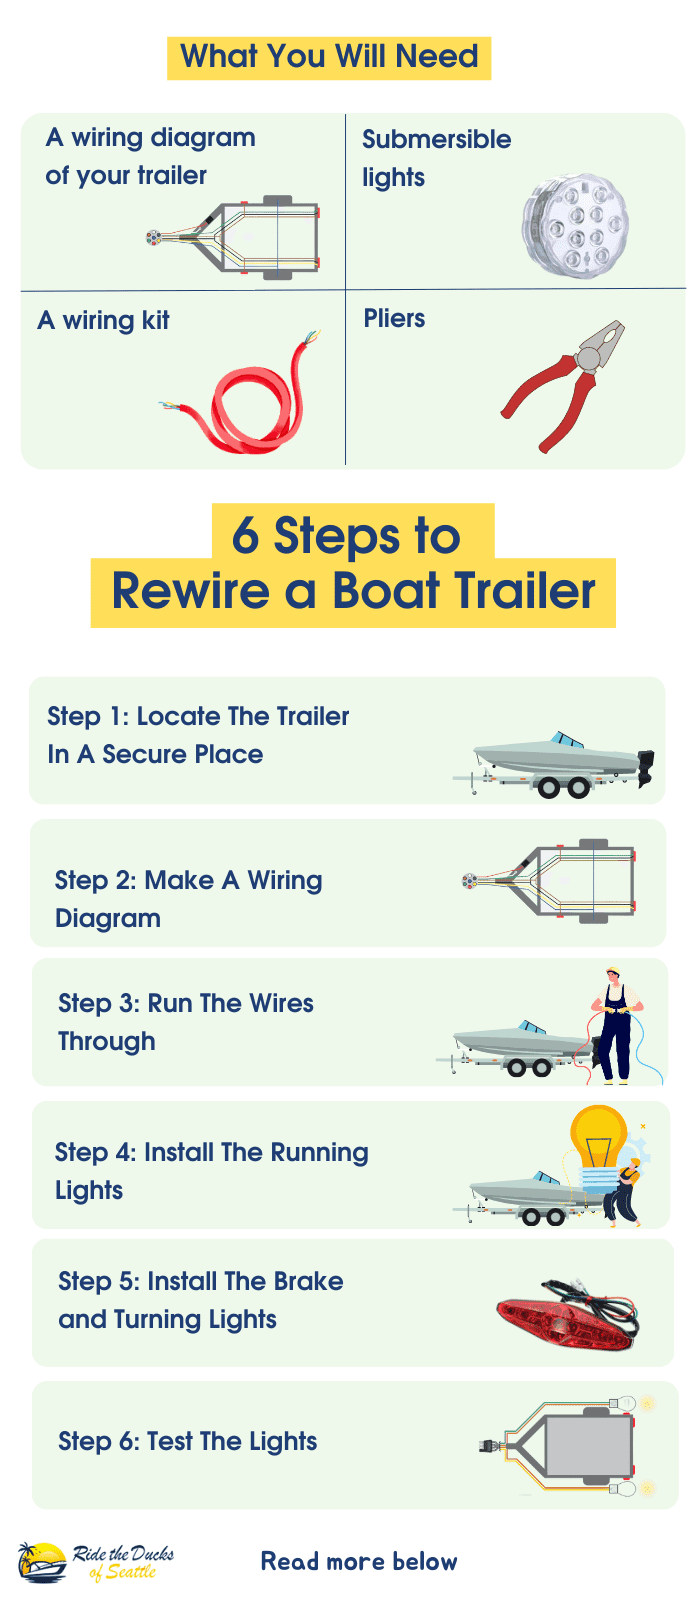
Table of Contents
Step-by-step to Rewire a Boat Trailer
What To Prepare
There are a few things to prepare before we get to the detailed steps on how to rewire a trailer. You won’t need any specialized tools; most of them can be found in your own toolbox at home.
- A wiring diagram of your trailer
- Submersible lights
- A wiring kit
- Pliers
Step 1: Locate The Trailer In A Secure Place
Before getting to work, make sure the trailer is staying in place by hooking it to your car’s tow bar. Also, we suggest you use wooden or concrete blocks to place on the front and rear sides of the trailer for a better anchoring effect.
With brakes like surge brakes, you’ll need a flat-four or flat-five.
- The flat-four has 5 colored wires, whereas the flat-five contains an extra blue wire to help deactivate the surge actuator.
- The flat-five one will come in handy if your trailer comes with disc brakes.
To know which one to buy, simply have a look at your trailer, then opt for the required model.
Also, make sure you have enough wires to use for the whole trailer; sometimes you will be short on wires using a wire kit, especially those that are meant to be universal.
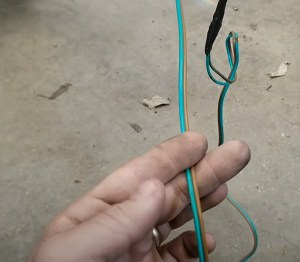
Step 2: Make A Wiring Diagram
Unless you have a superb memory, it’s good to sketch out a simple schematic of the wiring before removing them.
You’d want to draw out a layout of different wiring (colors, where they run through, etc.) through the sketch; it doesn’t have to be too detailed, just enough for you to remember where to run wire through boat trailer once all the old wirings are removed.
Step 3: Run The Wires Through
Even with a wiring a boat trailer diagram, you wouldn’t want to yank all the old wires out. It can be tempting to just do that, but leaving the old wires there will help feed the new wires through. This is also the best way for effective trailer rewire.
- Disconnect and remove your old lights by removing the bolts attaching them, then we’re going to start from the back of the trailer.
With most trailers, you will find a rubber grommet; pull that grommet out and get some old wires to work with.
- Hook the prepared fishing wire to a wire of your choice, then pull the old wire out until you can get the new wire through the tongue located at the front of the trailer.
- Then you cut off the excess, let it dangle, and repeat the process with other wires until you get all of them out on both sides.
Step 4: Install The Running Lights
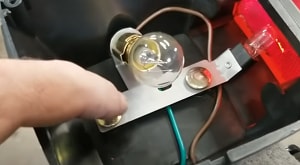
Once you’ve got all the wires out, it’s time to install boat trailer lights.
Start by stripping a little less than half an inch of insulation off the ends. The white wire is your ground wire; it connects any wire to any bolt behind the coupler.
Sometimes, you’ll find a connecting bolt instead of a wire. The thing is, they both rust quite easily, so here’s what we’re going to do.
We suggest you opt for crimp connectors instead of pinch-wire ones even though they’re commonly used among trailer brands. Pinch-wire connectors work fine in freshwater; however, these electrical connectors tend to rust rather quickly when coming into contact with salt water.
As for crimp connectors, they provide extra protection against corrosion. You can also double that prevention effect by securing all of the light connections with heat-shrink collars.
Step 5: Install The Brake and Turning Lights

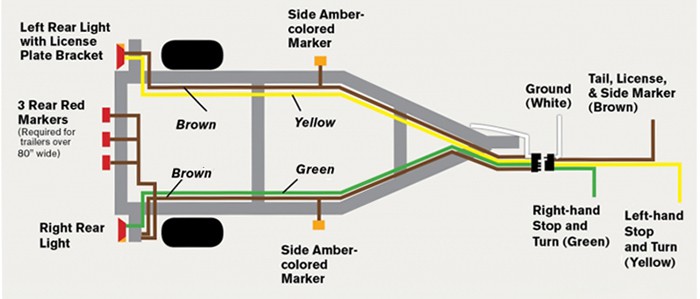
While the running lights have only one circuit, the taillights have two – one is for the running light, and the other is for the brake and turn signals.
The running light either comes with a black or wire; the brake/turn indicator lights come with red or green wire (for the right) and yellow wire (for the left).
What we’re gonna do here is pretty simple: connect the wires to their colors accordingly. Again, once you got everything done nicely and securely, use a crimp connector with heat-shrinking collars (similar to step 4) to make these connections.
Step 6: Test The Lights
Now that you have all the wires replaced and secured, do a light test. Take your vehicle out for a drive; take a turn or hit the break and see if your boat trailer lights wiring is working properly.
FAQs
Is it hard to rewire a boat trailer?
Rewiring a boat trailer can be quite intimidating if you’re not familiar with electrical wiring and DIY crafting projects in general. However, you don’t need much skill to replace the wire harness of a boat trailer. The process should take approximately 3 hours to complete, if not shorter.
Since you only need to follow the same pattern over and over again to replace the wire, this one-person project won’t be a tough row to hoe.
What is the color code for trailer wiring?
The color code for trailer wiring should be:
- The brown wire is your taillights/your running lights
- The yellow wire is your left turn signal and your left brake
- The green is your right turn signal and your right brake
How much does it cost to rewire a utility trailer?
The price for wiring utility trailer varies depending on the design of your trailer as well as the total labor cost. You can expect to spend from $50 to as much as $200.
We suggest you invest in a good wire kit according to your budget, which should cost around $30 to $100. A reliable wire kit is needed to extend the lifespan of your trailer.
How do I fix my trailer lights not working?
The most common problem when rewiring a boat trailer is the lights not working. When you encounter this problem, check the ground wires. It may be because the ground wires are not properly grounded that lead to the lights not turning on. Then, make sure the wiring plug is in good condition.
If the lights still don’t work, you might have damaged them when you were rewiring the trailer. The only solution now is to wire boat trailer again with new wiring.
Conclusion
And that’s how to rewire a boat trailer! With a good wiring diagram, you should be able to finish rewiring an entire trailer in no time. It is important to make sure you invest in the right wiring system or else your effort will soon go to waste. Besides, make sure you have 4 wires to rewrite the signals, brake lights, and the tail lights.

Ten years of enjoying countless trips on boats never made me love them any less! So I am here to put all those experiences into good use for other boaters who want to have a safe and fun trip with their friends and families.