
For boat owners, having a smooth boating trip without any trouble is like a dream. Aside from dealing with extreme weather conditions, it is believed that encountering technical issues, such as dead batteries or broken outboards are the most terrifying.
In case your boat breaks down suddenly in the middle of the water because of a dead battery, I suggest staying calm. Unlike cars, boat batteries can easily be replaced, even though it takes time and patience. You can attach dual batteries in a boat and avoid this kind of situation.
Thankfully, adding second battery to boats is an easy task if you follow the right instructions and this article about “How to hook up two batteries in a boat diagram?” is the place for that. In this discussion, I will provide a detailed tutorial on how to connect two batteries in a boat in 5 simple steps so that anyone can practice DIY dual battery setup boat:
- Choosing the suitable boat dual battery switch
- Attach the watercraft’s second battery
- Select a location for your vessel’s battery switch
- Intertwine the negative and positive cables
- Connect the cables together
Moreover, a list of tips to hook up dual batteries in a boat and further notices on attaching two batteries in a vessel in real situations will be highlighted in this article. So, you and other sailors can practice this process without too much difficulty. Continue reading to learn more!
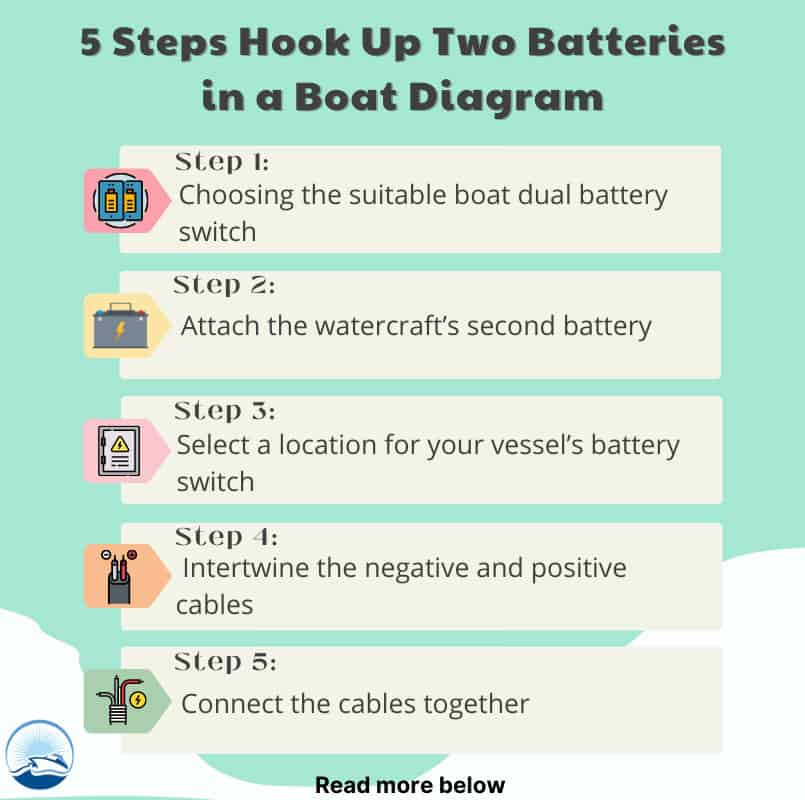
Table of Contents
Do You Need to Install Two Batteries in Your Watercraft
This question must have come up multiple times. Is it really necessary for me to have dual batteries on board? My response will undoubtedly be yes, but the actual truth is that it depends on what you need to do with your vessel and how much you trust your current battery’s capacity.
While sailing, most individuals utilize power on a daily basis. Electronics such as a fish finder, radar, or VHF radio are often turned on at all times. Some people keep the radio on all day to listen to music.
Nothing is incorrect with this; the issue is at the end of the day, if your boat just has one battery and it is completely dead, you are stuck. Someone might lend you a hand if you’re lucky.
If you are the only person on the water, you may need to hire a towboat, which may be costly. It is prudent to include a backup dual battery kit for boats and increase dependability as well as the feeling of security.
What You Need Prepare
So, if you are now determined to have a boat battery hookup diagram on board, it’s time for you to check out this list of necessary equipment and tools that will help you install another battery to the vessel’s power supply.
1. Tools for attaching two batteries to your watercraft
- A second marine boat battery
The type of the second battery is decided by the power demands of your vessel although we suggest utilizing the similar battery model with the craft’s original one. Auxiliary systems, including navigation units, lighting, and other energy-intensive operations, have larger plates to provide the consistent starting power and the ability to manage a wide range of loads.
- Battery selector switches
Uninstalling the batteries allows you to manage the overall amount of electricity used on board. They are used to plug and unplug electrical devices from the main power source, as well as to avoid battery depletion during inactivity.
- A bracket battery box
A battery box is a tiny carrying container that protects your battery. This type of encapsulation keeps water, oil, or other contaminants from entering the engine and leading that to fail. This is especially true if you are using lead-acid batteries, which may leach acid into your boat if they malfunction.
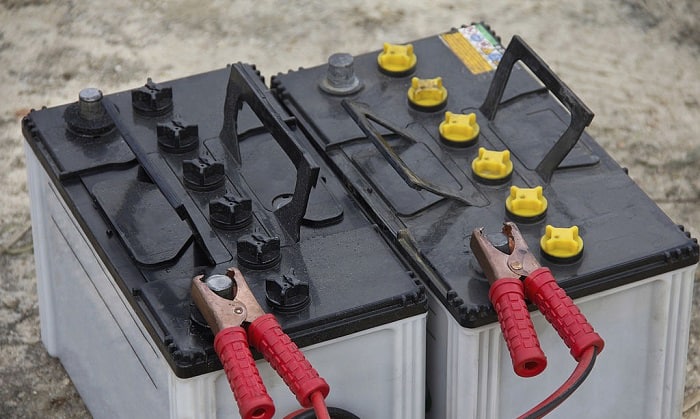
- Different color (red & black) 2/0 cables for boats
This maritime cable is much finer with tiny wire tying up on every strand. This gives it a high degree of flexibility, allowing it to sustain in a rolling, vibrating boat, whereas the tinned strands offer corrosion resistance. Furthermore, the different colors aid in identifying the cable to attach for positive and negative interconnections.
- 2/0 marine crimped or soldered cable lugs
Always place a cable’s stripped end into a part of the connector port, which is then physically distorted by compressing (crimping) securely around the cable. Crimping is commonly performed with crimping pliers and other specific crimping equipment.
- Heat-shrink tubes with marine cable-lug connections
To establish a safe barrier for your battery interconnections, heat-shrink will wrap an electrical wire or connector. It’s made of a material that compresses when heated, resulting in a snug fit. In electrical activities, it covers wires, connectors, and junctions from water and abrasion.
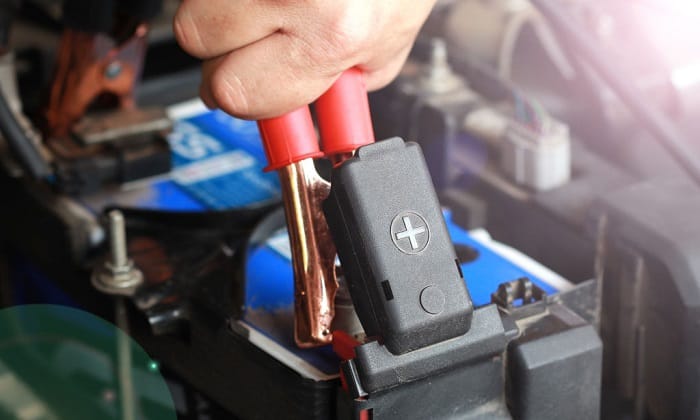
- Terminal caps for batteries’ positive ports
These coverings keep the battery from flaring or short-circuiting against the boat’s structure. These silicone, rubber, or polymer covers can also shield the battery terminals from contact with water and electricity.
2. Gears using to install dual batteries
- Cleaning brush
You’ll need this to remove corrosion from a battery’s terminal. Simply install the brush and wipe the positive and negative contacts of your battery. It may also be used to polish the battery posts.
- 10mm socket
Before you proceed with any action with the batteries, you must first replace it. To accomplish this operation, you could use a 10mm combination socket. Slacken the 10mm jack to remove the battery clamps.
- Dielectric grease
Utilize this dielectric grease to protect the cell terminals and prevent the battery from corroding. Dielectric grease might help your batteries make better connections. As a result, keep in mind to have this in your toolbox.
Essential Elements to Calculate Before Installation
Having an extra battery in your yacht is a smart choice. It will help improve the performance of your vessel. Instead of carrying just one, you would have the capacity of dual batteries for your watercraft.
After finishing the preparation, it is important to examine the following factors before practicing the installation. You should research about these carefully to guarantee that the one you select will work well and will not be a waste of time.
1. Space
There should be enough physical space. You can’t add an extra one if there’s no place for it. You may create a separate cabin for your backup battery. The most essential thing to remember here is that your backup battery, similar to the first, must be completely secure and protected.
2. Wiring up
Batteries must be interchangeable. To avoid power distribution difficulties, get a backup battery that resembles the first. Both circuit routes should have the same length. The positive connection of the old battery should be connected to it, while the negative one of the new battery should be joined to it.
A Step-by-step Tutorial
Now, it is time for you to practice hooking up two batteries. Follow these steps and complete the procedure effortlessly!
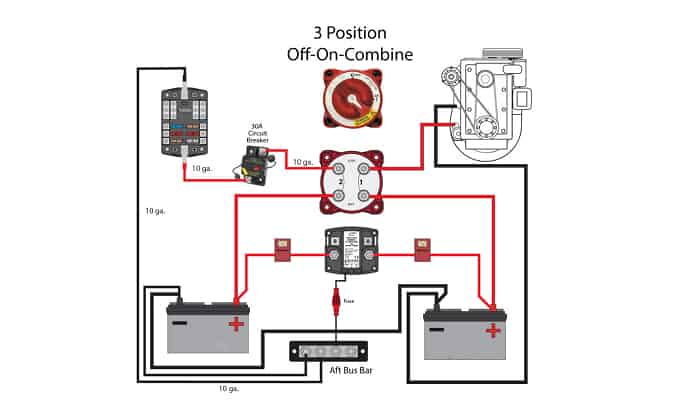
Step 1: Choosing the suitable boat dual battery switch
Check if the dual battery control switch on the boat is designed for two batteries and can handle the current generated while starting the engine. A continuous output of 250 amps is sufficient for most trolling motors and/or petrol inboards.
For further security against vessel theft, switchgears with locks are available, and some have field disconnecting circuits to preserve the alternator in case the batteries are switched off while the motor is running.
Step 2: Attach the watercraft’s second battery
The installation must adhere to local regulations. However, wet-cell batteries should be stored in their box. Nevertheless, absorbed fiberglass batteries do not need to be packaged. Tie-downs or brackets are required for both, and non-conductive clothes should be utilized to wrap the positive terminals.
Step 3: Select a location for your vessel’s battery switch
Since selector switches include a four- to six-inch broad footprint, be sure to place them on a surface with enough space. According to standard standards, the switch should be as close to the batteries as possible and conveniently accessible.
Also, It can be flush-mounted over decks for a thinner bezel, but it must be protected from the weather. Before completing the installation, ensure that the positive wires are connected to the connections at the back.
Wiring a dual battery switch is one of the easiest chores. For your battery packs, you can choose batteries with a double switch. This keeps your batteries charged and keeps them from halting.
In addition, you must follow these rules:
- While joining two batteries, ground both of them in the same engine’s common ground.
- To ensure proper installation, attach one battery to a separate ground wire as well as the second one to the other line.
- Inspect whether the ground wire on the engine compartment can transfer the power from both batteries or not. Therefore, having a second connection to the fresh battery is advisable.
- The cells must fit inside the enclosed terminal cover.
Step 4: Intertwine the negative and positive cables
All insulation coverings and insulating materials must contain or have the word “marine cable” imprinted on them. It will aid in the appropriate connecting of positive and negative wires to their respective terminals. With a size 2/0 cable, you can reach most outboards or petrol inboards.
Plug two batteries’ positive connections to the switch’s corresponding posts on the back. Then, attach the motor’s positive cable to the switch’s output port. Link the output post with the positive supplemental wire in a safe manner as well.
Step 5: Connect the cables together
For the dual system to work properly, a crossover connecting the negative connections of the battery cells is necessary. Fasten all terminal screws as well as connect the engine negative cable lug and the auxiliary wire to one of the negative battery ports.
Conclusion
After all, adding a supplementary battery to your yacht is a fantastic idea. By doing this, you will never have to worry about having dead batteries on board, which may probably destroy the fun. Moreover, this will ensure that you and other boaters are able to handle any circumstance relating to watercraft batteries.
Most of all, we hope that the above information and guidelines can help you hook two batteries in your boat diagram appropriately without too much effort. Hence, a wonderful boat trip with a strong vessel powered by a dual battery system is no longer an impossible dream!
Did you enjoy the article on how to hook up two batteries in a boat diagram? Do you want to add anything else? Please let me know and leave a comment below.

Ten years of enjoying countless trips on boats never made me love them any less! So I am here to put all those experiences into good use for other boaters who want to have a safe and fun trip with their friends and families.