
There are certain occasions when repainting fiberglass boat covers is essential. These cases can be when your vessel’s visual has been heavily damaged due to extreme weather conditions or when you are no longer fond of your craft’s appearance.
No matter which case it is, if you want to proceed with painting a fiberglass boat, do it by yourself. Although it is faster to bring it to professionals, it will be very expensive because they tend to charge you unnecessary fees. Practicing the DIY fiberglass boat painting process will not only save you some money but also give you chances to customize the boat to your own taste!
If you are looking for simple instructions on “How to paint a fiberglass boat?”, this article is perfect for you! In this post, we will provide knowledge relating to multiple types of fiberglass boat paint and compile a detailed tutorial on the simplest method of fiberglass vessel painting.
Moreover, further notices while purchasing suitable paint for fiberglass boat hulls and what materials and tools are needed for the procedure will be highlighted so you and other sailors can execute this process without too much difficulty. Continue reading to learn more!
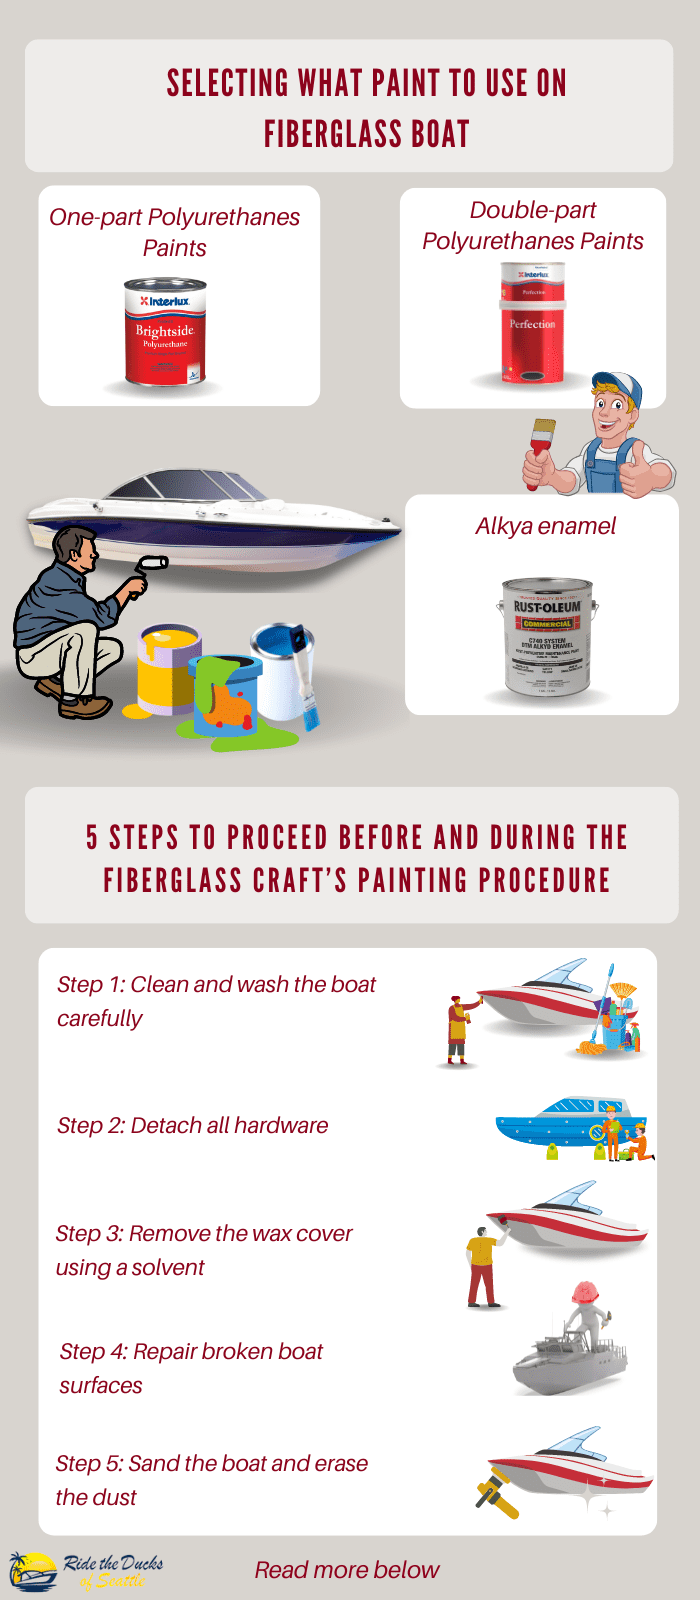
Table of Contents
Selecting What Paint to Use on Fiberglass Boat
Choosing and purchasing the right paint for a fiberglass boat can be confusing for newbies as there are many products and segments available in the market. So, read this following section carefully to select the suitable paint for your vessel!
1. One-part Polyurethanes Paints
Polyurethanes are the most often used one-part paint nowadays. These acrylics can be placed directly using a process known as “rolling and tipping.” One person utilizes the paint by rolling it on, while another removes it by brushing it out with a dry brush’s tip. When done correctly, it is comparable to spraying. A smooth job requires proper thinning.
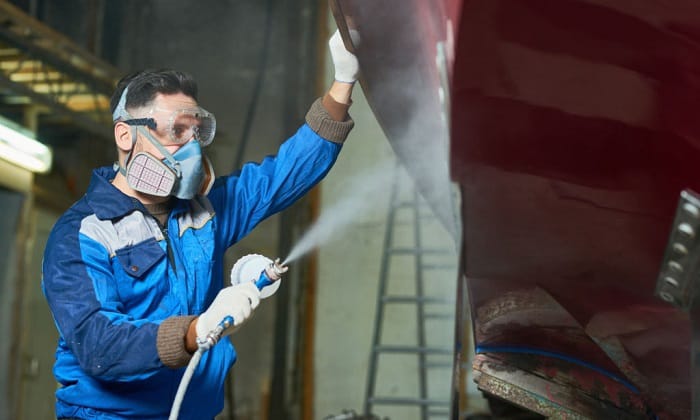
These pigments can be sprayed as well. Make sure you think about where the overspray will go so everything that will not be coated is masked off. The equipment may often be rented.
2. Double-part Polyurethanes Paints
Two-part polyurethane paint is the greatest in terms of endurance or gloss retention. The paint is extremely thin, necessitating numerous applications. It chemically stiffens, however, it offers an extremely robust finish that will endure for many years.
Most two-part polyurethane paints are intended for professional use. In reality, many are poisonous, necessitating the use of a high pressure mask as well as a spray booth while painting.
Some are intended to be applied mechanically by rolling and tipping. A few manufacturers have produced double-part water-based paint solutions that can be washed with water.
Because of the thinness of each layer, proper boat pretreatment for these paints is much more severe. Paint will not cover imperfections, instead, it will exacerbate them.
3. Alkya enamel
This is a classic oil-based paint. It is easier for a beginner to apply with a brush and is less expensive than other alternatives. The product is also more friendly with the paint that is currently on your boat.
Tools and Materials Required for Fiberglass Boat Painting
Before stepping into the process, there are some essential tools you’ll need to prepare.
1. Before painting
You will have to wash, polish, and remove the dust remaining on the craft’s surface. Therefore, you should prepare:
- Power-pressure horse
- Scrapper
- Car soap (Also applied for boats)
- Painter’s tape
- Grinder
- Epoxy mixture
- A number of clean dry cloth
2. During painting
Some people may mistake that they will only need paint and brush in this phase. However, as vessel painting is much more complicated than drawing a picture, here are some other materials that you are advised to include in your tool box:
- Primer
- 300-grit sandpaper
- Paint roller or brush
- Boat paints with the color of your choice
- 3M tape
These are all you need to have to start painting your ship! Following the instructions below to begin the boat painting process!
Steps to Proceed Before and During the Fiberglass Craft’s Painting Procedure

First, you’ll want to prepare your boat for the new paint. It is critical to have all supplies available and conveniently accessible for a speedy and seamless operation. This will be the most important aspect of your painting project. Taking the time to plan ahead of time can save you time and effort in the long run.
Step 1: Clean and wash the boat carefully
This is something you should do each time you bring the boat out. Ensure that you are using a high-pressure hose, rags, and possibly a scrapper. It is critical to properly rinse the boat whenever you clean it. Don’t ever leave the soap lying about on the boat.
Step 2: Detach all hardware
Remove hard parts as much as possible to provide a neat and clean paint finish. If you are still unable to take away something, protect it by covering it with painter’s tape.
Step 3: Remove the wax cover using a solvent
If you sense a waxy surface on your boat, you must eliminate it before painting. Paint will not adhere to a waxy texture.
Step 4: Repair broken boat surfaces
Fresh paint can highlight all of your boat’s scrapes and scuffs, so fix them before repainting. Minor scuffs may be buffed out, while bigger scratches can be filled with epoxy.
Step 5: Sand the boat and erase the dust
After the job has been completed, polish the boat’s surface. This may be done manually or with an electric grinder. Don’t mind replacing your sandpaper when it wears down! After you’ve completed sanding, utilize a clean cloth to wipe all the dust before proceeding to the next stage.
During the Fiberglass Craft’s Painting Procedure
You’re now prepared for the thrilling part! A primer can be used to start, even though it is not required for a fiberglass watercraft. Make sure that the primer you’re using is suitable with the paint you’ve selected.
After you’ve finished one coat of primer, gently sand the boat with 300-grit sandpaper before placing the second coat. For optimal results, start painting after 2 hours from the finish of the priming.
When you’re ready to start painting, make sure to follow the manufacturer’s instructions. Then, using a paint roller, apply the first layer. To continue, open the can and shake (make sure to stir occasionally throughout the process too). In addition, two 4″ foam roller sleeves will be included with your order.
Waiting about one to two hours after the first layer of paint before removing any 3M tape which you’ve placed. Then, apply your second cover. To get into those hard-to-reach places, try to use a brush.
It is critical to shield the paint from bugs or dirt in order to do the best work possible. Check that the paint has fully dried based on the manufacturer’s instructions. Constantly wash your boat fully after use to keep the paint looking nice for many years. Also, guarantee that the boat is adequately sheltered from ice throughout the winter season.
Tips and Tricks From Experts
- When selecting paint colors, keep this in mind. Dark hues may appear appealing, but because fiberglass is technically plastic, they will draw heat, causing shrinkage or distortion. For the long term, lighter hues are preferable.
- It is preferable to paint when the temperature is between 70 & 80 degrees Fahrenheit and the humidity is less than 70%.
- Tidy brushes and rollers will lead to a great difference in the finished product, so try to alter or wash them each half hour.
- The greatest results will be obtained by two workers painting a huge area fast. The first one should roll on the pigment, and the second person should follow after with a brush to level out any irregularities in the brush strokes. This is referred to as the roll & tip technique.
- To remove dust away, have lint-free towels on hand. Additionally, cleanse the watercraft after each usage to keep the paint looking good for longer, but avoid using strong cleansers or abrasive scrubbers.
Conclusion
It is true that cleaning the boat by yourself may be really time-consuming yet it will certainly save you a significant amount of money in boat’s maintenance. We hope this knowledge and information will help you and sailors perform fiberglass boat painting effortlessly and effectively so that having a clean and refreshing boat even after a long time of traveling will not only be a dream!
Did you enjoy the article on how to paint a fiberglass boat? Do you want to add anything else? Please let me know and leave a comment below.

Ten years of enjoying countless trips on boats never made me love them any less! So I am here to put all those experiences into good use for other boaters who want to have a safe and fun trip with their friends and families.