

Do you notice rotting sections in your wooden watercraft? Not only is water a wooden vessel’s nemesis, but UV rays can also undermine your boat’s integrity. You do not have to worry about these things if you know how to waterproof wood for a boat.
Waterproofing wooden boats not only protect watercraft from water and UV damage. It can also safeguard your watercraft against humidity when on dry land. Thankfully, waterproofing a wooden vessel is not too complicated, and I will describe how.
You only have to complete several steps: sanding & cleaning the boat, applying sealant, and applying boat paint.
Things You Need for This Tutorial

Learning waterproof wood for a boat is as straightforward as applying paint on any wood surface. However, it would be best to prepare a few things to get yourself ready for waterproofing wooden surfaces on a boat.
1. Knowledge of the Reasons for Waterproofing a Boat Made of Wood
The marine environment is different from what we have on land. While you may not have dust and dirt to worry about, other elements can wreak havoc on your boat and cause long-term damage.
It is essential to understand that marine plywood is different from ordinary plywood. This special wood for a boat has more layers than regular plywood that protect the boat’s interior against water ingress. However, there are other issues one must address.
For one, there are UV rays that can weaken the structure of wood. Waterproofing plywood can protect the boat against harmful UV radiation, and extend the boat’s service life.
Water damage is always a concern among wooden boat owners since boats are always in constant contact with water. Wood can rot, undermining the boat’s integrity and safety. Using the correct sealer can prevent rot and retain the boat’s structural integrity at the same time.
There is also the problem of moisture when storing your boat on dry land. Water in the air or water vapor can seep through the wood on misty days. Pontoon boats and dinghies can also get drenched on a rainy day.
2. Waterproofing Tools
One essential material for waterproofing is a sealer. The majority of boaters use marine-grade epoxy that acts like a super-sticky glue in direct contact with the boat’s plywood. Applying a coat of this product is similar to applying a coat of paint. It forms a perfect seal on the wood.
You will also need a paintbrush or a foam brush to waterproof your boat. These materials can form a better seal than a roller.
3. Other Materials
Low-grit sandpaper is also important because it prepares the wood for the perfect waterproof seal. If you want efficiency in waterproofing your watercraft, I recommend a random orbit sander.
You will also need a clean rag or cloth to clean the watercraft after sanding. It would be wise to remember that you need to sand the boat after each application of a waterproof seal.
Paint formulated for the marine environment is another product you might want to include. Not only does it give your boat a more refined finish, but it can also enhance the waterproof seal on your watercraft.
Steps to Waterproofing a Wooden Boat
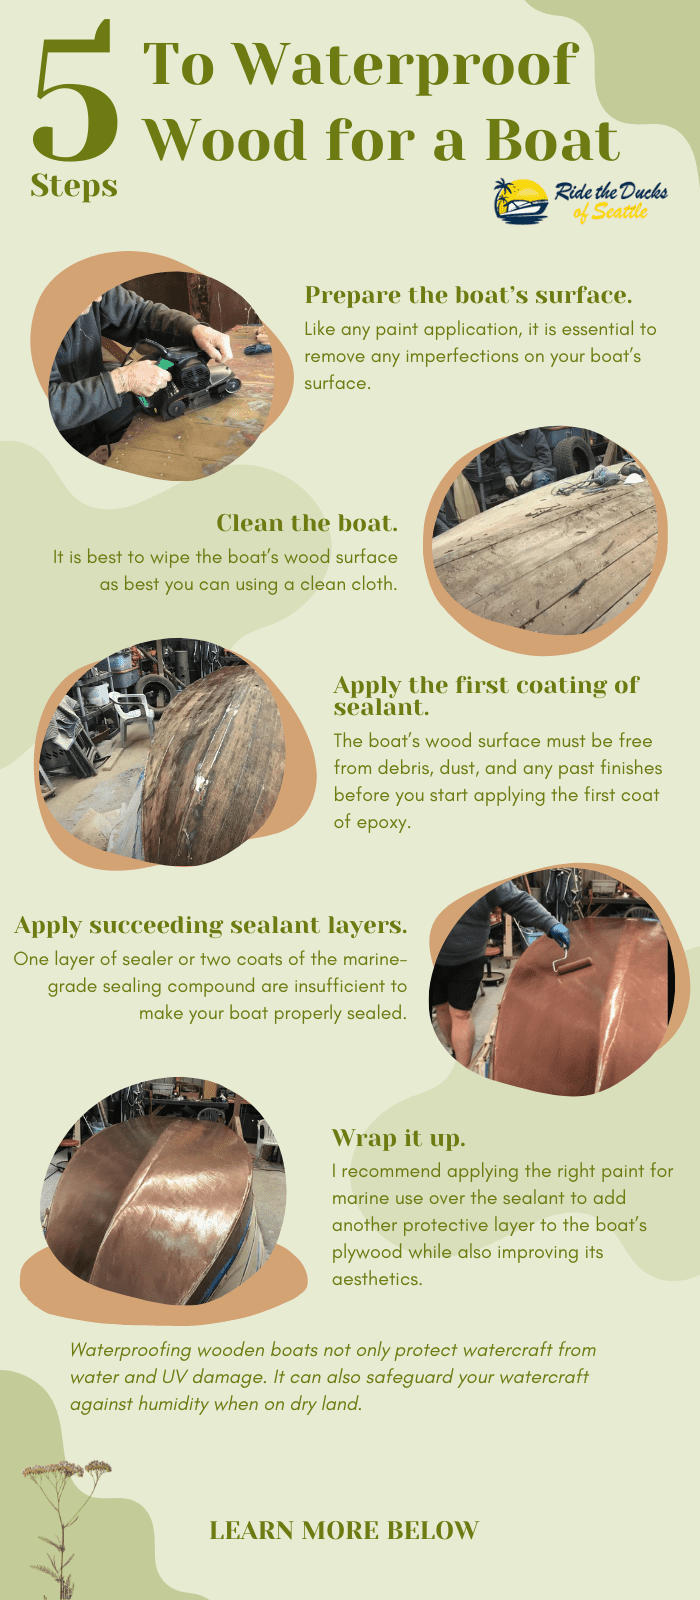
Step 1. Prepare the boat’s surface.
Like any paint application, it is essential to remove any imperfections on your boat’s surface. The best way to do this is to sand the boat with low-grit sandpaper to eliminate any stray wood bits. I recommend starting with 80 or 100-grit sandpaper.
Start sanding every square inch of your boat’s wood surface, inside and out. Doing this will ensure a more robust epoxy adhesion, guaranteeing better protection for your boat.
Sikana English prepared an excellent video about sanding any woodwork using sandpaper. You can observe the same sanding techniques in preparing your boat’s wood surface.
Pro Tip: Most boat owners use an orbital sander, cutting the preparation time in half.
Step 2. Clean the boat.
Sanding the surface leaves dust and dirt on your boat, affecting proper epoxy coating adhesion. That is why it is best to wipe the boat’s wood surface as best you can using a clean cloth.
If you want to ensure a more thorough cleaning, I recommend washing your boat to remove strands, debris, dust, and dirt. It would be best to use a power washer for this to blast particles off your boat.
However, if you decide to go the wet route, it is crucial to let the surface dry completely before moving to the next step in waterproofing wood boat.
Step 3. Apply the first coating of sealant.
The boat’s wood surface must be free from debris, dust, and any past finishes before you start applying the first coat of epoxy. It would be best to wait at least 12 hours before epoxy application if you washed your boat in Step 2.
Start sealing your boat’s plywood surface by dipping your foam brush in the marine wood sealant and applying a thin coating of sealer on the boat. Try to be systematic in your sealer application, covering every surface area of your boat.
Pay special attention to the boat’s edges, corners, and other tricky parts. You might want to use a small brush to ensure a proper seal in these sections.
Check your sealant’s recommended curing process. Most products require four to ten hours after application of the first layer before applying the next layer.
Here is a video from Kidnanz TV on applying a sealer on wood using only a paintbrush. The video is not about boats, but you can apply the same techniques when waterproofing marine plywood.
Step 4. Apply succeeding sealant layers.
One layer of sealer or two coats of the marine-grade sealing compound are insufficient to make your boat properly sealed.
The more layers your boat has, the more layers of boat wood sealer or marine waterproofing wood application you need. Remember to observe the recommended sealer curing times for each application.
For example, if your watercraft’s marine plywood has ten layers, you will apply ten sealant coatings. It can take you ten days to complete the project if you observe 12 to 18 hours of curing after each sealant application.
It is also crucial to sand the surface before applying each succeeding coating. Surface sanding ensures a stronger sealant adhesion to the surface.
Step 5. Wrap it up.
I recommend applying the right paint for marine use over the sealant to add another protective layer to the boat’s plywood while also improving its aesthetics.
The steps are similar to sealant application, dipping the brush in paint, and applying it on your boat’s inside and exterior surfaces. You will want a smooth finish to make your boating adventures worthwhile.
You can use waterproof paint for the wood boat for this step. I use Rust-Oleum’s Marine Topside Paint to give my wooden boat a more contemporary look.
You will be glad for all your hard work once you finish the waterproofing process on your boat.
Conclusion
Did this tutorial give you the confidence you need on how to waterproof wood for a boat? Waterproofing your watercraft lets you enjoy taking your vessel on adventures. I am sure your friends and social contacts would love that, too. You can share this article with them if you want.
I will also appreciate any comment or feedback you have about this article. I would love to hear your thoughts and answer the questions you might have.

I am passionate about water sports and technical fields, so combining both makes me interested in making contents about boat accessories. With my partner, we went on many trips and sports games together, which led us to think about how we can spread our joys and passions to many people.