Have you ever wondered how to bottom paint a boat on a trailer? Bottom painting a watercraft keeps slime, barnacles, weed, and other nasty marine creatures from growing under your vessel. It is one of the best ways to safeguard its integrity and functionality.
Unfortunately, seasoned boaters do not recommend bottom painting a boat while on trailer because there will be some sections you will not cover.
However, bottom painting a watercraft on a trailer is still doable, and I will share with you a trick or two some boaters use. Follow my 9-step guide, which comprises double- cleaning, stripping the old paint, sanding the surface, and more.
Table of Contents
Things You Need for This Tutorial
Bottom painting your boat while on its trailer requires:
- Cleaning tools
- Surface preparation materials
- Paint application resources
- The best bottom paint you can buy
Copolymer ablative paints are perfect for boat owners who want a more controlled release of biocides without losing the bottom paint’s antifouling ability. This paint is perfect for those who store their boats during the winter.
If your watercraft stays on the water all year round, you will need a hard-modified epoxy paint with high copper content. There are also single-season varieties of this paint.
Boat owners who do not like working with high-copper-containing paints can use products with composite copper technology. These bottom paints contain copper as low as 40%.
If you love boating in freshwater, algae growth is always a concern. The most suitable bottom paint for this is a thin-film paint.
Steps for Painting a Boat’s Bottom on a Trailer
Step 1. Clean your boat
It is best to remove any organic growth and slime from your bet when it is still wet. Leaving these objects to dry on the watercraft’s bottom requires chiseling them off – a more tedious task.
That is why it would be best to power spray your boat’s bottom as soon as you get it from the water and onto your trailer. You can also use a hand scraper to loosen stubborn barnacles, slime, and other objects.
If you notice chipped paint, it will be wise to spray this, too.
Step 2. Strip the old paint, if necessary
It is never wise to paint the bottom of a boat without removing the old paint, particularly if you intend to use vinyl paint over a non-vinyl coat. These paints contain aggressive solvents that can lift non-vinyl paint coatings off the boat’s surface.
Inspect your boat’s bottom if you see signs of paint flaking, chipping, sloughing, or lifting. Painting over these sections will lead to poor pigment adhesion. That is why it is best to strip the old paint.
Use a hook scraper to remove the old paint from the boat’s bottom. It is safer and more straightforward than using a chemical stripper.
If your boat’s bottom does not have any issues with its existing paint, you can skip to Step 3.
Step 3. Sand the surface
If your boat’s bottom paint is still intact and in good condition, all you need to do is smoothen it using 80-grit sandpaper connected to a random orbit sander. Using 80-grit disks can chew through the bottom paint and damage the laminate. A belt sander is also not advisable because it can flatten the hull.
It would be best to attach a vacuum hose to your sander to collect and remove sanding dust. You might also want a shop-vac to make debris removal more efficient.
Pro Tip: Wear safety goggles and a particle respirator when sanding your boat’s bottom.
Step 4. Clean again
Wash and clean your boat’s surface again to blast any sanding-associated dust and debris. If you are confident about your vacuum attachment, a simple wipe with a clean cloth is sufficient.
What is essential in a bottom painting boat on trailer is to have a particulate-free surface for the paint to create a strong bond to the surface.
Ensure complete drying before proceeding to Step 5.
Step 5. Mask off borders
Ordinary masking tape will peel off in less than 24 hours. That is why you need a long-mask tape, such as the 3M 2090 ScotchBlue Painter’s Tape. I find this masking tape useful for boat painting jobs because it sticks to the surface for up to 60 days and is UV-stable.
Check your boat’s boot stripe and start sticking the tape on a natural break in the line. Press the masking tape to the surface every 1.5 to 2 feet to ensure a smooth border.
Do not forget to mask off transducers, through-hulls, propeller shaft struts, and other metal components.
Step 6. Cover your trailer
While you will use a paint roller for this project, pigment can still splatter onto your trailer. That is why it is best to cover your trailer with old newspapers or large plastic sheets.
Secure the overlapping sheets with tape, ensuring there are no holes or gaps. It will also help to fasten the sheets’ outer edges with a rope to keep them from flying.
Step 7. Prepare the bottom paint
Do not apply the bottom paint straight from the can. It is essential to shake it first to facilitate the thorough mixing of pigments and copper. Ideally, you will want to place the paint can on a paint shaker and run the device for five to ten minutes.
You can use a mixing paddle attached to a power drill if you do not have a paint shaker.
An improvised method is to pour half of the bottom paint into a container. Get a mixing paddle and vigorously mix the remaining paint in the can. Do not stop until the paddle can no longer scrape anything from the can bottom.
Slowly pour the other half back into the paint while continuously mixing. Do not stop until you get a uniform consistency and color, which should take about 15 minutes or so.
Step 8. Paint the surface
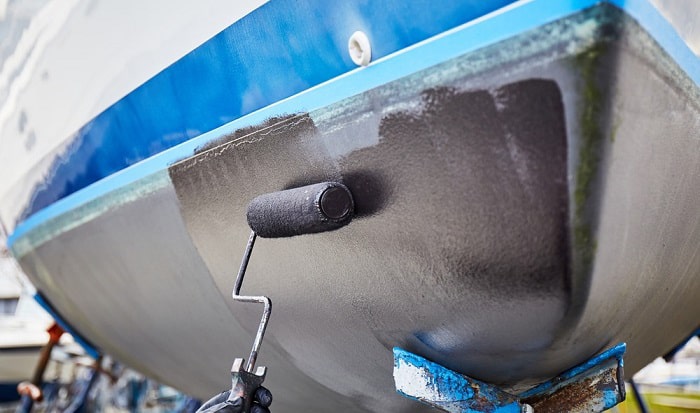
Pour the paint on a roller pan and pick up some pigment with your foam roller. Apply the paint on your boat’s bottom in an up and down motion. You can start from the waterline and work your way towards the keel.
It would be wise to work fast because this paint type dries quickly. Moreover, do not forget to mix the bottom paint every time you refill your paint tray.
Read the paint manufacturer’s instructions on how many coatings you need to apply. Ensure you have the preceding coat completely dry before applying the next layer of paint.
Pro Tip: Attaching an extension handle to the roller can help you reach higher boat sections.
Step 9. Reposition your boat
Allow the bottom paint to dry thoroughly before repositioning your boat.
Take your watercraft into the water and maneuver it back into the trailer, ensuring you expose those sections not yet painted.
Bring your boat back to your shed and start working on the unpainted areas, observing the steps outlined above.
I found an excellent bottom painting video from West Marine. The boat is not on a trailer, but the process is similar.
Conclusion
Many boat owners are clueless about how to bottom paint a boat on a trailer. Your knowledge of this trick gives you an advantage over others while taking care of your watercraft’s hull.
If you find this tutorial beneficial, would you share it with your social contacts? I am certain they will also want to learn the secret to bottom painting a vessel on a trailer. I will also be grateful for any comments or feedback you might have.

I am passionate about water sports and technical fields, so combining both makes me interested in making contents about boat accessories. With my partner, we went on many trips and sports games together, which led us to think about how we can spread our joys and passions to many people.


